This dress grabbed me and I really want to have it ready for warm weather and maybe some trips to the shore over the summer.
I subscribe to Red Heart's newsletter and sometimes I'm really impressed with the patterns that they put out and this one looks really great.
It's open and airy, has a simple but hopefully, flattering shape, and is FREE.
I started it with the hook recommended, but of course, my gauge was off and I went down a size. Unfortunately, the stitch height it slightly short, but that I can deal with. I'm slightly worried that blocking will really make it to big, but we'll see.
Project page here.
This is where I am so far. Just beginning the increases for the skirt.
Showing posts with label free pattern. Show all posts
Apr 10, 2015
Apr 16, 2014
WiP - Baby Blanket
I went on to Little Knits the other day.....and I saw this yarn. It's discontinued, but I knew it had to be a baby blanket and for the price, I couldn't pass it up.
Since it's such a busy yarn, I figured I wouldn't bother with any kind of fancy design; you wouldn't be able to see it anyway. Instead I chained about 150 and did double crochet until I ran out of yarn...about 10 rows. I grabbed my Bernat Baby Sport in Kiwi to make an "accent" row of tilted squares, using Mypicot's Openwork Lace # 2042. I can't link directly to the pattern, but her site is awesome.
The first time, I used the same size hook as the rest of the blanket, but it pulled a little tighter than I would like, and that was with me actively trying to keep the stitches big and loose. So the second accent row was done in a hook that was 0.5mm larger...so from 4.5mm (body of blanket) to 5.0mm (H hook). I think it works out much better now.
Here is my Ravelry Project Page. Don't worry, I'm still working on my vest, but my issue is that I keep finding breaks in the yarn. Although Knit Picks has compensated me for the one skein, another one has had multiple breaks and weak spots...it's getting rather frustrating. I'm on my third skein for the project and I have about 30 ends to tie in already.
Since it's such a busy yarn, I figured I wouldn't bother with any kind of fancy design; you wouldn't be able to see it anyway. Instead I chained about 150 and did double crochet until I ran out of yarn...about 10 rows. I grabbed my Bernat Baby Sport in Kiwi to make an "accent" row of tilted squares, using Mypicot's Openwork Lace # 2042. I can't link directly to the pattern, but her site is awesome.
The first time, I used the same size hook as the rest of the blanket, but it pulled a little tighter than I would like, and that was with me actively trying to keep the stitches big and loose. So the second accent row was done in a hook that was 0.5mm larger...so from 4.5mm (body of blanket) to 5.0mm (H hook). I think it works out much better now.
Here is my Ravelry Project Page. Don't worry, I'm still working on my vest, but my issue is that I keep finding breaks in the yarn. Although Knit Picks has compensated me for the one skein, another one has had multiple breaks and weak spots...it's getting rather frustrating. I'm on my third skein for the project and I have about 30 ends to tie in already.
Apr 3, 2014
Sweater FO
Now that I've finished the world's most boring blanket...I'm so sick of that stitch, I have started and finished a baby sweater.
I just love this pattern, the Wrap Diaper Shirt. I had made one for Ethan and now I have made one for my little lady, Lily. Here is my Rav Project Page.
This flies off the hook and it literally, only takes a few hours.
I just love this pattern, the Wrap Diaper Shirt. I had made one for Ethan and now I have made one for my little lady, Lily. Here is my Rav Project Page.
This flies off the hook and it literally, only takes a few hours.
Apr 2, 2014
WiP Wednesday - Girlie Dress
I have yet to block the monster blanket, or finish the one I started for my little girl, but I need a break from blankets for the moment, so I've made and finished a sweater (I'll post that tomorrow) and I've started a dress. Ironically, it's not any of the dresses that I have featured on some of my Monday posts about baby girl stuff, but it's quite lovely anyway...
The pattern is called, Angel Wing Newborn Pinafore and so far, it's chugging along at a good rate. I would say that her patterns aren't very elegant, but they get the job done.
My gauge seems to be off, the pattern is coming out much larger than normal for me. Usually I have to go up a hook size as I tend to crochet tighter than gauge, but not with this project. I'm not sure this will fit a newborn...maybe more like 3 months.
This yarn, the Bernat Baby Sport is really nice. Good stretch and it's very soft. It also comes in these huge skeins, which is nice for churning out a bunch of baby stuff that all matches (if you're into that....which I totally am).
Here is my Rav Project Page.
The pattern is called, Angel Wing Newborn Pinafore and so far, it's chugging along at a good rate. I would say that her patterns aren't very elegant, but they get the job done.
My gauge seems to be off, the pattern is coming out much larger than normal for me. Usually I have to go up a hook size as I tend to crochet tighter than gauge, but not with this project. I'm not sure this will fit a newborn...maybe more like 3 months.
This yarn, the Bernat Baby Sport is really nice. Good stretch and it's very soft. It also comes in these huge skeins, which is nice for churning out a bunch of baby stuff that all matches (if you're into that....which I totally am).
Here is my Rav Project Page.
Jan 1, 2014
WiP Wednesday - Granny Stripe Blanket
I've been in the mood for some mindless crocheting lately and have put on quite a few rows to this blanket. It has grown more than a foot.
Oh....Happy New Year ! (almost forgot)
Rav Link
Here she is:
Oh....Happy New Year ! (almost forgot)
Rav Link
Here she is:
Jul 1, 2013
Jun 29, 2013
Free Purse Tutorial
I'm reluctant to call this a pattern. I don't plan to proofread or edit this and I don't plan to make any corrections. This is just a loose set of instructions to make this bag.
(Editted to add): Here is my project page on Ravelry.
Link to the Pattern on Ravelry.
I used all acrylic yarn because it's easily washable and durable and doesn't stretch as badly as cotton.
I used about 250g of Worsted Weight.
With I Hook, chain 49.
Round 1 : hdc in second chain from hook and all the way across, 6 hdc in last chain and working on the bottom of the chain, hdc across, 5 hdc in first chain, join w. sl st to top of chain 2
Round 2 : ch 2, hdc in same st and in each across, 2 hdc in each next 5 hdc, hdc in each st across to last 4, 2 hdc in each, join w. sl st to top of chain 2 (chain 2 counts as a stitch)
Round 3 : ch 2. hdc in same st and in each across, once you get to the area where you have 2 hdc in each stitch, 2 hdc in each next 8 (or 9) sts, hdc across, to last 7 (or 8) groups of 2 hdc, and work 2 hdc in each, join w. sl st to top of chain 2
Notes: At this point, depending on your gauge, you need to make sure it's flat and not wavy, so you may need to do more or less "2 hdc to 1 stitch" groups.
Round 4 : Here is where we begin working the body of the bag; ch 3 (counts as a stitch), dc BLO in next st and all the way around, join w. sl st to top of chain 3
Round 5 : Ch 3, dc in next st, dc dec over next two stitches, dc to other "end" of the bag, where the curve is and somewhere near the middle do another dc dec over two stitches, dc across and sl st to top of beg chain 3
Round 6 - desired length : Repeat rounds 4 and 5 alternating until you reach your desired length and/or width
I did this until my bag was about 12" high, but if you keep going it could get very narrow, so keep an eye on width and stop the decreases once you're happy. You can also not do any decreases at all if you want it to be straight on the sides
Last round : ch. 1 and sc in each st around, join with sl st to chain 1 and fasten off.
Handles
Spacing - measure the width at the place where you want to put the handles, for me it was about 1.5" down from the top of the bag.
16" - so, 4.5" in from the two edges of the bag I joined the yarn by sl st around the dc in the row, sl st around next 3 sts, 4 sts total
Chain 2, turn, hdc in next 3 sts, turn.
Repeat last row until strap measures 22", sl st to the body of the bag on the same side, make sure that the strap isn't twisted. I attached it at about 4.5" from edge
That's it, weave in your ends and you're ready to go...! I might line it with some fabric...we'll see.
(Editted to add): Here is my project page on Ravelry.
Link to the Pattern on Ravelry.
I used all acrylic yarn because it's easily washable and durable and doesn't stretch as badly as cotton.
I used about 250g of Worsted Weight.
With I Hook, chain 49.
Round 1 : hdc in second chain from hook and all the way across, 6 hdc in last chain and working on the bottom of the chain, hdc across, 5 hdc in first chain, join w. sl st to top of chain 2
Round 2 : ch 2, hdc in same st and in each across, 2 hdc in each next 5 hdc, hdc in each st across to last 4, 2 hdc in each, join w. sl st to top of chain 2 (chain 2 counts as a stitch)
Round 3 : ch 2. hdc in same st and in each across, once you get to the area where you have 2 hdc in each stitch, 2 hdc in each next 8 (or 9) sts, hdc across, to last 7 (or 8) groups of 2 hdc, and work 2 hdc in each, join w. sl st to top of chain 2
Notes: At this point, depending on your gauge, you need to make sure it's flat and not wavy, so you may need to do more or less "2 hdc to 1 stitch" groups.
Round 4 : Here is where we begin working the body of the bag; ch 3 (counts as a stitch), dc BLO in next st and all the way around, join w. sl st to top of chain 3
Round 5 : Ch 3, dc in next st, dc dec over next two stitches, dc to other "end" of the bag, where the curve is and somewhere near the middle do another dc dec over two stitches, dc across and sl st to top of beg chain 3
Round 6 - desired length : Repeat rounds 4 and 5 alternating until you reach your desired length and/or width
I did this until my bag was about 12" high, but if you keep going it could get very narrow, so keep an eye on width and stop the decreases once you're happy. You can also not do any decreases at all if you want it to be straight on the sides
Last round : ch. 1 and sc in each st around, join with sl st to chain 1 and fasten off.
Handles
Spacing - measure the width at the place where you want to put the handles, for me it was about 1.5" down from the top of the bag.
16" - so, 4.5" in from the two edges of the bag I joined the yarn by sl st around the dc in the row, sl st around next 3 sts, 4 sts total
Chain 2, turn, hdc in next 3 sts, turn.
Repeat last row until strap measures 22", sl st to the body of the bag on the same side, make sure that the strap isn't twisted. I attached it at about 4.5" from edge
That's it, weave in your ends and you're ready to go...! I might line it with some fabric...we'll see.
Jan 25, 2013
Ribbit Cowl Project - FO
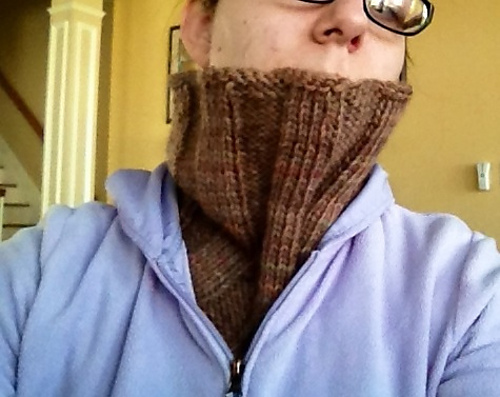
I have completed yet another cowl, and like the others, I plan to have it available in my Etsy store. It's an improvised design, as I couldn't find something as simple as this. I hesitate to write out what I did, in case I missed something in my pattern quest. I will include it here for now, but if someone feels that I've swiped their pattern, then I will have to take it down.
Sorry for the yucky iPhone picture....
Pattern: My own improvisation (Ribbit Cowl)
Yarn: Crystal Palace Yarns Kaya - Spice Market (110 yds total)
Needles: US10 (6.0mm)
Made For: Etsy Store
Notes: I cast on 80sts, placed a stitch marker, and joined to form a circle.
Next I knit 5 and purled 5 around
I continued this until my cowl was approximately 8 inches tall and loosely bound off with a size 11 needle
Ravelry Project Page
Sorry for the yucky iPhone picture....
Pattern: My own improvisation (Ribbit Cowl)
Yarn: Crystal Palace Yarns Kaya - Spice Market (110 yds total)
Needles: US10 (6.0mm)
Made For: Etsy Store
Notes: I cast on 80sts, placed a stitch marker, and joined to form a circle.
Next I knit 5 and purled 5 around
I continued this until my cowl was approximately 8 inches tall and loosely bound off with a size 11 needle
Ravelry Project Page
Dec 5, 2012
Rounded - Free Pattern
I wanted to create something that could be made quickly and easily modified. This pattern is fast and relatively easy. The name of the pattern is "Rounded". I realize that it's not very imaginative, but I used up all that energy in the design phase.
It can be used in many different size yarns and hooks to get different size “motifs”. With a worsted weight yarn and ‘I’ Hook, I made something big enough to be a trivet or a dishcloth.
I have editted this pattern myself, so if there are any errors, please send me a note and I will correct the pattern.
In the attached photo, I have used two different color yarns, but this is not included in the pattern, as I did this more for a tutorial effect. I think it makes it easier to see the different rounds.
PDF Download
Ravelry Link
It can be used in many different size yarns and hooks to get different size “motifs”. With a worsted weight yarn and ‘I’ Hook, I made something big enough to be a trivet or a dishcloth.
I have editted this pattern myself, so if there are any errors, please send me a note and I will correct the pattern.
In the attached photo, I have used two different color yarns, but this is not included in the pattern, as I did this more for a tutorial effect. I think it makes it easier to see the different rounds.
PDF Download
Ravelry Link
May 16, 2011
Fingerless Gloves for Men - free pattern
I wanted to make a Christmas present for a friend of mine. A male friend. He always says that his hands are cold when he's on the computer and gloves are impossible to wear while needing to type.
I decided a pair of fingerless gloves would be perfect. I searched around and couldn't find any, for men, that are long and come to the middle knuckle. I thought about making a pair for women and just making them longer, but I realized that man hands are quite different than woman hands and I proceeded to force my husband to submit to much hand measuring and trying-on of these gloves.
Here is the final version.
Ravel It!
One size
Materials:
I Hook
Cotton Classic Tahki Stacy Charles or any worsted weight (Please note: this is a little thinner than some other worsted weights); 2 skeins, 100g/216 yds
Mid forearm at ~9” circumference.
Notes: These are to fit a man’s forearm and hand. I’ve noticed that this is distinctly different than the way mitts need to fit women. These are interchangeable in terms of left hand versus right hand.
Ch. 35, join with a sl st to form a ring.
Rnd 1: ch.2 (counts as first hdc now and throughout), hdc in each chain around, sl st to top of chain 2
Rnd 2: Ch. 2 hdc in each st around, sl st into top of chain 2
Rnd 3: Repeat round 2
Rnd 4: Ch. 1, sc in same st and in each st around, join with sl st to first sc
Rnd 5-6 : Repeat round 2
Rnd 7 -10: Repeat round 4
Rnd 11: Ch. 1, sc in same st, (sc in next 10 sc, sc2tog) 2 times, sc around, sl st to first sc
Rnd 12: repeat round 4
Continue to repeat round 4 until desired length (to wrist).
The pair I made had approximately 2.5” of the sc part.
Next 5 rnds: repeat round 2
Next rnd: ch 2, (hdc in next 10 sts, 2 hdc in next stitch) 2 times, hdc around, sl st to top of chain 2
Next 4 rnds: repeat round 2
Thumb
Chain 5, skip next 11 sts and sl st to next st, leave rest of sts unworked and turn to work on thumb.
Rnd 1: Ch 2, hdc in each st around, join with sl st to top of chain 2
Rnd 2-3: repeat rnd 1, finish off.
Attach yarn to juncture where chaining for thumb, ch 1,sc in same spaced, sc along bottom edge of chains, when reaching the hdc edge, hdc around and sl st to first sc.
Next 2 rounds: repeat rnd 1 of thumb.
Next round: Ch. 2 (hdc in next 10 sts, hdc2tog in next st) 2 times.
Next 2 rounds: repeat rnd 1 of thumb. Finish off.
I decided a pair of fingerless gloves would be perfect. I searched around and couldn't find any, for men, that are long and come to the middle knuckle. I thought about making a pair for women and just making them longer, but I realized that man hands are quite different than woman hands and I proceeded to force my husband to submit to much hand measuring and trying-on of these gloves.
Here is the final version.
Ravel It!
One size
Materials:
I Hook
Cotton Classic Tahki Stacy Charles or any worsted weight (Please note: this is a little thinner than some other worsted weights); 2 skeins, 100g/216 yds
Mid forearm at ~9” circumference.
Notes: These are to fit a man’s forearm and hand. I’ve noticed that this is distinctly different than the way mitts need to fit women. These are interchangeable in terms of left hand versus right hand.
Ch. 35, join with a sl st to form a ring.
Rnd 1: ch.2 (counts as first hdc now and throughout), hdc in each chain around, sl st to top of chain 2
Rnd 2: Ch. 2 hdc in each st around, sl st into top of chain 2
Rnd 3: Repeat round 2
Rnd 4: Ch. 1, sc in same st and in each st around, join with sl st to first sc
Rnd 5-6 : Repeat round 2
Rnd 7 -10: Repeat round 4
Rnd 11: Ch. 1, sc in same st, (sc in next 10 sc, sc2tog) 2 times, sc around, sl st to first sc
Rnd 12: repeat round 4
Continue to repeat round 4 until desired length (to wrist).
The pair I made had approximately 2.5” of the sc part.
Next 5 rnds: repeat round 2
Next rnd: ch 2, (hdc in next 10 sts, 2 hdc in next stitch) 2 times, hdc around, sl st to top of chain 2
Next 4 rnds: repeat round 2
Thumb
Chain 5, skip next 11 sts and sl st to next st, leave rest of sts unworked and turn to work on thumb.
Rnd 1: Ch 2, hdc in each st around, join with sl st to top of chain 2
Rnd 2-3: repeat rnd 1, finish off.
Attach yarn to juncture where chaining for thumb, ch 1,sc in same spaced, sc along bottom edge of chains, when reaching the hdc edge, hdc around and sl st to first sc.
Next 2 rounds: repeat rnd 1 of thumb.
Next round: Ch. 2 (hdc in next 10 sts, hdc2tog in next st) 2 times.
Next 2 rounds: repeat rnd 1 of thumb. Finish off.
May 17, 2010
Dramatic Gauntlets - Free Pattern
Apr 1, 2010
Crochet Paisley Motif - Free Pattern
Paisley Motif
I hook
H hook (optional)
With larger hook:
Rnd 2: ch 2, hdc in same st as join, 2 hdc in each dc around, join with sl st to top of ch 2
Rnd 3: ch 1, sc in same st as join, 1 sc in ea next 5 hdc, hdc in next hdc, 1 dc in ea next 5 hdc, ch 4, sc in next hdc and in each hdc around, join with sl st to first sc
Row 4: Row 4: sl st in next 5 sts
Sc in next st
Hdc, ch 1, hdc over next 2 sts
1 dc each in next 2 sts
Yo twice, insert hook into next st, draw up a loop, yo draw through 2 loops, twice (2 loops now)
Next: Yo twice, insert hook into top of ch 4, draw up a loop, yo draw through 2 loops on hook, 2 times, yo and draw through last 3 loops.
Turn.
Sc in next st
Hdc, ch 1, hdc over next 2 sts
1 dc each in next 2 sts
Yo twice, insert hook into next st, draw up a loop, yo draw through 2 loops, twice (2 loops now)
Next: Yo twice, insert hook into top of ch 4, draw up a loop, yo draw through 2 loops on hook, 2 times, yo and draw through last 3 loops.
Turn.
Row 5: ch 4, trc in next 2 sts, dc in next 2 sts, ch 1, turn
Row 6: hdc in first st, dc in next st, dc2tog in last dc, ch 2, turn
Row 7: skip first st, dc in last st, end off (unless adding optional border)
Optional:
Attach new color (finish off first color)
Now working along the edge of the motif and with the smaller hook
Turn
Ch 3, sl st in 3rd ch from hook (picot made)
Border: sl st evenly around, alternating with picots, sl st to first picot, finish off
Note: keep sl st loose and go into the chains for turning rather than around them
Oct 15, 2008
Tear/Rain Drops
Let me just relay a few warnings before attempting this pattern. Firstly, I'm the only person who has made it; I've made it twice, so if you find any errors, I apologize for it in advance. You're welcome to leave me comments if you find any errors (or if you just feel like leaving me some ;-o ).
This pattern is fairly crude and sort of awkward, but once you start with it, you get the point and can go off on your own, I'm sure. If you have any questions, please ask, but I can't guarantee a helpful answer. Okay, now that my disclaimer is complete, here goes nothing:

Tear/Rain Drops
Originally uploaded by aurentium
Tear Drop Pattern
Sz 10. Thread
Sz 5/1.7mm Steel Crochet Hook (Susan Bates)
Notes: ch 3 counts as first dc throughout
dec = decrease
Pattern:
Row 1: ch 4, 1 dc in first chain, turn
Row 2: ch 3, dc in same st, 2 dc in next dc, turn
Row 3: ch 3, dc in same st, 1dc in ea next 2 dc, 2 dc in last dc, turn
Row 4: ch 3, dc in same st, dc in next dc, 2 dc in next dc, 1 dc in ea next 2 dc, 2 dc in last dc, turn
Row 5: ch 3, dc in same dc, dc in ea next 3 dc, 2 dc in next dc, 1 dc in ea next 3 dc, 2 dc in last dc, turn
Row 6: ch 3, dc in ea dc across (12dc)
Row 7: ch 3, dc in next dc, 2 dc in next dc, (1 dc in next 2 dc, 2 dc in next dc), repeat until end; only 1 dc in last
dc, turn
Row 8: ch 2 (first hdc), hdc in same dc, hdc in next 2 dc, 2 hdc in next dc, 1 hdc in ea next 7 dc, 2 hdc in next dc,
1 hdc in next 2 dc, 2 hdc in last dc, turn
Row 9: ch 3, dc in next hdc, dec over next 6 hdc (2 sts at a time), 2 dc in next hdc, dec over next 8 dc (2 sts at
a time), 1 dc in ea last 2 hdc, turn
Row 10: ch 3, dc in next dc, (dec over next 2 dc, dc in next dc) across, 1 dc in last 3 dc, turn
Row 11: ch 1, sc in ea dc across, turn
Row 12: ch 1, sk first sc, sc in each sc across, sl st in last sc, turn
Row 13 - 15: Repeat Row 12; but at the end of Row 15, continue around edges to make it smooth, sl st to first sc.
Finish off.
Starch as needed.
This pattern is fairly crude and sort of awkward, but once you start with it, you get the point and can go off on your own, I'm sure. If you have any questions, please ask, but I can't guarantee a helpful answer. Okay, now that my disclaimer is complete, here goes nothing:
Tear/Rain Drops
Originally uploaded by aurentium
Tear Drop Pattern
Sz 10. Thread
Sz 5/1.7mm Steel Crochet Hook (Susan Bates)
Notes: ch 3 counts as first dc throughout
dec = decrease
Pattern:
Row 1: ch 4, 1 dc in first chain, turn
Row 2: ch 3, dc in same st, 2 dc in next dc, turn
Row 3: ch 3, dc in same st, 1dc in ea next 2 dc, 2 dc in last dc, turn
Row 4: ch 3, dc in same st, dc in next dc, 2 dc in next dc, 1 dc in ea next 2 dc, 2 dc in last dc, turn
Row 5: ch 3, dc in same dc, dc in ea next 3 dc, 2 dc in next dc, 1 dc in ea next 3 dc, 2 dc in last dc, turn
Row 6: ch 3, dc in ea dc across (12dc)
Row 7: ch 3, dc in next dc, 2 dc in next dc, (1 dc in next 2 dc, 2 dc in next dc), repeat until end; only 1 dc in last
dc, turn
Row 8: ch 2 (first hdc), hdc in same dc, hdc in next 2 dc, 2 hdc in next dc, 1 hdc in ea next 7 dc, 2 hdc in next dc,
1 hdc in next 2 dc, 2 hdc in last dc, turn
Row 9: ch 3, dc in next hdc, dec over next 6 hdc (2 sts at a time), 2 dc in next hdc, dec over next 8 dc (2 sts at
a time), 1 dc in ea last 2 hdc, turn
Row 10: ch 3, dc in next dc, (dec over next 2 dc, dc in next dc) across, 1 dc in last 3 dc, turn
Row 11: ch 1, sc in ea dc across, turn
Row 12: ch 1, sk first sc, sc in each sc across, sl st in last sc, turn
Row 13 - 15: Repeat Row 12; but at the end of Row 15, continue around edges to make it smooth, sl st to first sc.
Finish off.
Starch as needed.
Subscribe to:
Posts (Atom)